23.1. Import GIS Data |
With this command we can import files in ESRI shapefile formats (*. SHP), Geographic Markup Language of the Open Geospatial Consortium (*. GML), GeoJSON (*. GEOJSON) or GeoPackage (*.gpkg). The program will ask us for the file to be converted and will automatically draw the entities in the CAD.
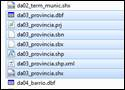
Additionally, in the case of files in shape format, in addition to the selected file with SHP extension, there must be at least other files with the same name and with other extensions, which contain information about attributes (.dbf) and spatial indexes (.shx), which is necessary and associated with the file to be imported.
In the following image you can see the set of files associated with a SHP file to be imported.
Once the file has been selected, the following window will appear in which we can manage and represent the attributes associated with the file to be imported.
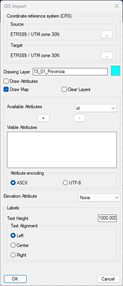
Coordinate Reference Systems (SRC): The import also considers the possibility that the Shape or GML file is in geodetic coordinates.
If this is the situation, we will uncheck the box for "Projected coordinates" and we would select the SRC in which the cartography we want to import is located. The process will perform the conversion to projected coordinates automatically.
In the event that the file to be imported is located at projected coordinates, we would only have to activate the corresponding box.
Drawing Layer: Layer on which the entities resulting from the import of the selected file will be drawn.
Color: By clicking on this button we can choose the color of the resulting layer, and therefore in which the entities will be drawn.
Draw Map: This option will be activated by default and it indicates that the lines or polylines resulting from the import of the file are drawn.
Clean Layer: By activating this option we delete all the existing entities in the layer that we have designated for drawing the entities.
Draw Attributes: Likewise, if this option is enabled, the attributes associated with the ArcView file and that we have previously selected will be drawn.
Available Attributes: All the attributes existing in the selected ArcView file.
Visible Attributes: A set of selected attributes that we want to draw when importing the ArcView file.
Texts: In this section, in the case of having an attribute to draw, we configure the representation of them, from the height of the text to the alignment of the text.
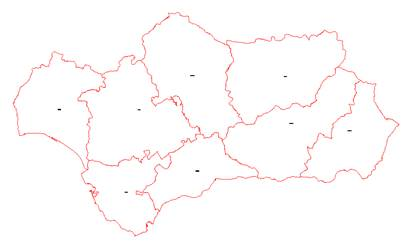
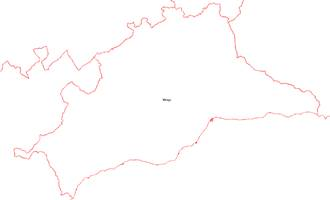
Below is the result of importing a file in shape format with its corresponding attributes.
If files are imported GeoPackage, after selecting the file, the following window will appear where we will indicate the entities to draw or import.
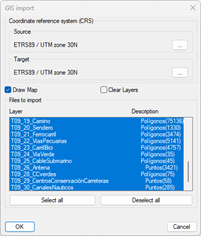
Coordinate Reference Systems (SRC): This tool will automatically detect the projection system in which it is located in the selected file, however, there is the possibility of changing both the source and destination SRC.
Draw Map: This option will be activated by default and it indicates that the lines or polylines resulting from the import of the file are drawn.
Clean Layer: By activating this option we delete all the existing entities in the layer that we have designated for drawing the entities.
Files to be imported: Content of the selected GeoPackage file, by default all the layers that contain information are selected.
|
Insertar Mapa WMS/WMTS
|
The OpenGis consortium has http://www.opengis.org developed a protocol for obtaining geographic information through the Internet, and many public and private organizations have services of this type. This command allows you to connect to one of these services, download an image or images, and insert them into the current CAD drawing at the appropriate coordinates.
OGC's WMTS (Tile Web Map Service) provides a complementary approach to WMS (Web Map Service); WMTS uses a parameterized tile model in such a way that a client can make requests for a discrete set of values and quickly receive tiles from the server. Each of the layers of a WMTS server follows one or more pyramidal scale structures, in which each scale, or level of the pyramid, is a regular raster and fragmentation of geographic data at a particular scale or pixel size. Therefore, only one layer can be selected, unlike with WMS where you can select as many layers as you want.
First, a window appears with a list of the various map services configured in the program. This list includes a Name to identify the service, and a Web Address where you can make the map request. Items can be added to the list by typing on the line marked *. In addition, you have to specify the projection of the drawing, and if you want to obtain an image that occupies the entire visible drawing area, or designate a smaller window.
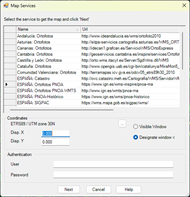
WMS-T Services: Currently some of the map services support the possibility of specifying the date that you want to have as a reference for the import of the map. This type of parameters is specific to each supplier. The user can specify this parameter in the appropriate address. Below is an example in which the web service of the Cadastre of Spain is accessed for a specific date.
The projection or SRC of the current drawing will be automatically displayed, however it can be changed or assigned by pressing the (...) and it will show us the following dialog:

When the service requires basic authentication, you can enter the Username and Password to access the service which will be encrypted and stored for later use.
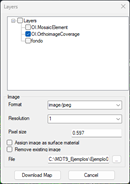
When you press the Next button , the program connects to the service selected in the list and another window appears to select the layers to include in the image, as well as the format of the image. These options depend on the service selected.
If there is a surface in the drawing, the possible options for the dialogue will be, Assign Image as Material to the Surface, if we activate this option, the program is enabled to display this image in the commands Field tour, Road trip and Generate video tour. The Option Delete Existing Image It is enabled in case the drawing already has an image inserted. By activating it, you can easily replace a previous image with another, in case you run the command more than once.
When the selected service is WMTS, it is allowed to select a resolution other than the one calculated from the designated window and the zoom of the drawing, the list of resolutions will depend on the selected layer. To do this, in the Resolution box you can select the desired value.
You can give a name to the downloaded file and choose the location by pressing the corresponding button.
Pressing the button Download Map The request for the image begins, and finally the program will request a file where it can be saved. A second file will be automatically created with the georeferencing data of the image, and the image will be inserted into the drawing.
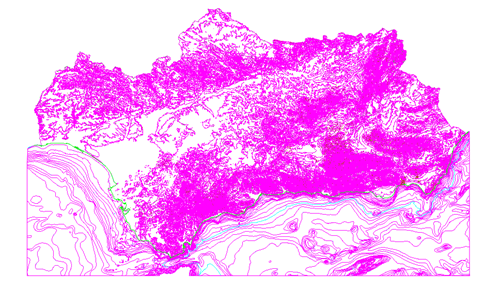
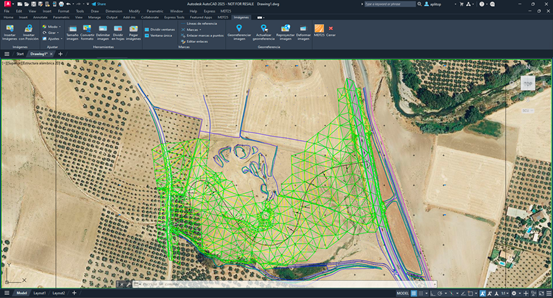
The result is to download an image could be the following:
It may be the case that the download of the map is not carried out because there is no internet connection to the outside, this can happen in local or corporate networks in which the internet connection is controlled by a user and password system. Therefore, the command, if it cannot download the map because there is no internet connection, will request the username and password in a new window, so that if it exists, the user can enter the corresponding data. This data can also be added from the Utilities>Settings>Updates and fill in the data requested in the section Proxy Data.
(2) The SRTM "Shuttle Radar Topography Mission" consists of a specially modified radar system that flew aboard the Space Shuttle Endeavour to acquire stereoscopic topographic elevation data . The elevation models derived from the SRTM data are used with the GIS Geographic Information System software, which can be accessed free of charge on the internet, and whose extension (.hgt) is supported by many software.
|
|