In this option we define fill slopes, the same as in the previous case of cutting, with those that we will usually be working with in cross-section definitions. The same as before, in the template definition it is possible to define new slopes without needing to use this command.
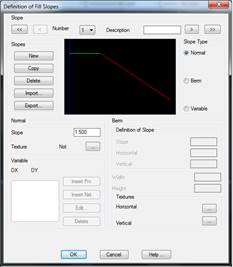
The following window will appear for defining the slopes according to their needs.
A description of the button functions follows:
Number: Drop-down list for selecting a slope from those existing in the section file.
Description: Text for identifying the defined fill slope. It is not a necessary parameter, but it will be of enormous use in the assignment of sections as it makes each slope assigned be easily identified.
Delete: Deletes the current slope and automatically moves to the next slope if one exists.
Print: Sends the slope content to the printer.
Copy: Creates a slope identical to the current one and assigns it the next number following the last on the list.
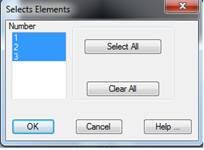
Export: Displays a window containing all the slopes ready to be exported, so that any of them may be selected.
Once validated, the slopes selected are exported to the file then specified. The output file is an ASCII file and has a .TAL extension.
Import: Imports any file with a .TAL extension and adds it to the current platforms. All this information is saved in the template file selected.
New: Creates, by default, a Normal-type slope, assigning it the number following the last on the list. To identify different types of slopes, proceed as follows.
Select the Slope Type to define one of the three options for slopes that can be applied.
Normal Slope
Slope with a single vector. In this field, key in the value resulting from dividing the abscissa (x) and ordinate (y) values making up the slope gradient (tangent) as an absolute value.
A texture can be applied to it with a view to the road’s 3D representation.
Normal-type slope.