3. Features and Functionality
For users having the TcpMDT application, the file formats used are totally compatible, so that all files can be prepared on a PC and subsequently sent to the mobile device using the Microsoft ActiveSync or Microsoft Windows Mobile Device Center application. For all other users, a PC program is included that incorporates the most common file format conversions, in addition to serving as a data manager for the data obtained with the field data recorder.
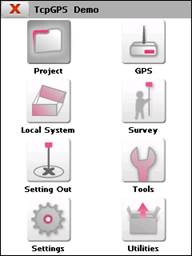
This is an application based on dialog boxes that appear with a main menu made up of a series of graphic buttons that enable one to access the program’s different options.
Either the  or
or  buttons should be clicked to exit a dialog box. These appear on the upper right hand side of the screen. The cancel button serves to exit the dialog box without accepting any changes or without taking into account any calculations that may have been made.
In the majority of the dialogues the menu button  also appears on the title bar. Using this button you can access different additional options.
The units of measurement of the application’s data are as follows:
|
Data
|
Units of Measurement
|
|
Geographic coordinates
|
Degrees, minutes and seconds
|
|
Geocentric coordinates
|
Meters
|
|
Projected coordinates
|
Meters
|
|
Distances
|
Meters
|
|
Altitudes
|
Meters
|
|
Areas of surface
|
Square meters
|
|
Perimeters
|
Meters
|
|
Azimuths
|
Grads. 0º North
|
|
Tolerances
|
Meters
|
|
Lengths
|
Meters
|
|
Height of antennas
|
Meters
|
|
Offset of antennas
|
Meters
|
|
Stations
|
Meters
|
|
Interval of stations
|
Meters
|
|
Slopes
|
X Inc. (m ) / Y Inc. (m)
|
|
Stakeout tolerances
|
Meters
|
|
Precisions
|
Meters
|
|
Superelevations
|
Percentage
|
|
Epochs
|
Seconds
|
This allows you to work in slopes and angle units other than those defined by default. The angle units may be gradians (by default), degrees or radians and the slope units, Inc. X (m) / Inc. Y (m) (by default), Inc. Y (m) / Inc. X (m) or percentage.
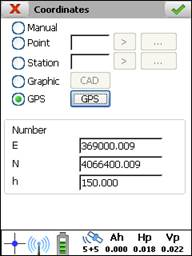
In the programme options where it is necessary to indicate the coordinates of a point, the following screen will be accessed by means of the corresponding button:
· Manual: This allows the coordinates to be entered manually.
· Point: This allows a point of any file to be selected by pressing the  button or to look for it in the current points file, entering its name in the corresponding box and pressing
  .
.
· Station: This allows a station of any file to be selected by pressing the button or to look for it in the current base file, entering its name in the corresponding box and pressing .
· Graphic: This allows a point to be selected graphically. A drawing is shown with the points and stations of the project as well as the cartography files.
· GPS: Obtains the coordinates which the receiver is currently receiving.
In all the data acquisition and setting out options, the application will show a bar with the essential receiver information (in order from left to right).
· Working mode: By pressing this icon the real time system is rebooted if working in RTK.
 Autonomous
 RTK Float or DGPS
 RTK Fixed
· Data link indicator: By pressing this icon detailed information is shown about the data link.
 Without data link
 With data link
· Battery status: By pressing this icon detailed information is shown about the charge of the battery or batteries if you have more than one. In this case the icon shows the status of the one which is charged most.
 Unknown battery level
  0 – 33 %
 34 - 66 %
 67 – 100 %
· Number of satellites used:  NAVSTAR constellation satellites (American) are shown by the blue colour of the icon and those of the GLONASS constellation (Russian) by the red colour. By pressing this icon detailed information is shown about the satellites received.
· Antenna height: Current antenna height.
· Precisions: Estimated horizontal (Hp) and vertical (Vp) precision.
Upon starting the application a first window is shown where the current version number appears.
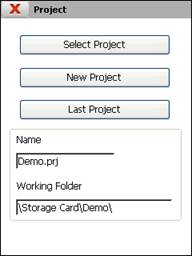
A new project should be created or an existing project should be selected to start up the application:
Last Project: This option selects the project worked on in the last session. When the application is initiated for the first time or when the program’s initial configuration is restored, it appears as deactivated.
Select Project: Allows one to select a previously created project.
New Project: Allows one to create an empty project.
Once the work project has been selected, the application’s main menu appears. The title bar shows the program’s name followed by the name of the active project.